Wednesday, 6 November 2013

October project part 2 - charm bracelet complete!


I finally completed the charm bracelet just in time for the birthday of it's recipient! The bracelet itself is a silver plated stretch one from Kernowcraft.

I made some extra charms using the heart and star cutters and some different texture plates. 

I then added some chunky tourmaline beads with head pins as this is one of the birthstones for October, I liked the colours  and I don't like the beads I was supposed to use for this project :)  

I also didn't use the bracelet send for the project either as I thought the person it was for would prefer a stretchy bracelet rather than one with a clasp.  The letter A charm is for someone special in her life.  I hope she liked it! 


Saturday, 12 October 2013

Squirrel silver clay pendant

I am so chuffed with this :)

I did most of the work on it at the same time as the charms I mentioned in my last post . The techique for making him was very similar to the owl and the hedgehog.

I used liver of sulphur again to give an aged appearance but then polished the majority of it off but less so for the actually squirrel, so he pops out of the design a little more.

To finish off I added a Tibetan silver acorn charm which dangles just above him.

I hope you like it as much as I do!


wet clay version
Finished pendant 

October project part 1 - charm bracelet experiments

I am skipping a post about my September project, partly because it isn't finished and partly because the playing about I did in this post kind of informs it and has changed my approach.

October's project is a charm bracelet using the beads from the August project and a new pack of silver clay to make silver charms for it.

I was supposed to use the circular cutter from the June project or some little card heart templates.  I of course chose neither. Instead I got some metal clay cutters from Jeweller Maker.


These are the charm bracelets I have to play with

I decided to use a mixture of cutters and textures. I used some texture plates from Kernowcraft, which I really liked and were easy to use with the clay. I also used some textured rubber stamps and some skeleton leaves and a letter stamp.  Really this was all about having a play and seeing what happened.  I only used leftover clay from other projects but i think it was a good use.

Here are the charms drying out with a rogue squirrel who will be discussed later.
Post firing 


After firing and polishing, I decided to experiment with some liver of sulphur, which is a solution that creates a patina on silver (an oxidation layer) and gives it an antique look. So some of them got dunked, they only need a few seconds.  The liver of sulphur stinks, you have to make a warm water solution but past experience with similar chemicals at work meant I wore latex gloves and used plastic tweezers throughout as this is nasty stuff!

After polishing but before dunking in liver of sulphur.  The liver of sulphur is in a stylish half pint mug. 

After dunking, all blackened

Leaf shapes detail

 After rinsing, I experimented with polishing the charms to see the effect of removing different levels of the patina. I am really pleased with the different effects. I love the heart one and the letter. I will be using skeleton leaves again as it was really effective. I am not sure about the flower shape, it might work better if I use a larger flower shape.

Finished charms!


Chainmaille gold flower necklace

My muse has returned from wherever she was sulking and the last 48 hours have been very very productive :)

I can't post a couple of projects because they are future birthday and Christmas presents but I have a few bits that I have completed in the last few days and am really happy with. This is the first one. 


This is an adaptation of the bracelet I did before with some round bits added at the front.  The jump rings are again from Creative Beadcraft who have lovely stuff but a crap record for actually posting it! Of the three orders I have placed with them now, I have had to chase two. :(

I am going on a rare night out next week so this might be a nice piece to wear, if I can find any clothes to wear with it.

Tuesday, 24 September 2013

Autumnal captured chain maille bracelet

I do love Pinterest it takes you all sorts of cool places and fires up all sorts of cool ideas. I was looking into chain maille techniques and came across this tutorial  from the good folks at Beadaholique, a website I can happily crawl inside with a hot cup of tea and a biscuit and not leave for some time. 

I had a beautiful leaf shaped clasp that I bought on my holidays from the fabulous little shop in Tenby. 


I had a bag of copper jump rings from some aborted ancient project and I had a load of Swarovski bicones left over from making my wedding jewellery (I really need to do a "what I made for my wedding post" soon, so you can see my true starting point in my jewellery making).  I decided to use an Autumnal theme and have green and orangey coloured crystals. 


Starting work on the bracelet


Here is the end result.  I have had a load of positive comments on it, I think it is perfect piece for this time of year. 


Monday, 16 September 2013

Purple Lamp Bead and Puffy Rondelle Link Necklace and Earrings

I was just starting to like Creative Beadcraft, I had just placed another order, despite this kit arriving 3 weeks after I ordered it. Two emails later it finally arrived with no explanation as to why it was late.

Though kit number 157 was complicated to put together, after my practice with the other kits I found it straightforward technically. Except for a few problems...


 Here's some of what was on my lap as I was working


First link, eyepin with crystal rondelle (more puffy ones :))


I then realised I needed to sit at my desk to assemble this one as I needed a bigger working space. 


 Adding the first lamp bead with a headpin and small silver bead. 

 All the lamp beads added 


 Finished necklace, I'm pretty happy with it.

 Then I decided to make the matching earrings.  I don't normally make earrings, as I tend to wear everything I make and I can't wear earrings because my ears have healed up from years of not wearing earrings.

This is where I need to whinge. The lamp work beads sent were a bit shoddy.  One had a weird extra hole in it and two were over drilled so the holes in them were massive and even with the little silver bead provided they didn't stay on the headpins. I used these ones for the earrings and luckily had some slightly larger silver beads in my big leftover bead box from when I did my evening class.

The instructions to make the earrings made NO SENSE. Complete rubbish, no way you could make an earring from them, I just used the picture on the sheet a a guide and did it my own way. They came out quite nice but I imagine an absolute beginner would be confused and unable to finish them.  I have ordered again from this company but just components not kits as I think they are overpriced (especially as you can get the weirdly written instructions on their website!) and buying just components is a lot cheaper. But it has been a good learning experience and I am glad I pushed myself to do it!


Finished earrings


Sunday, 15 September 2013

Chain maille bracelet with crystal detail

I have been tired this week so the two projects I have done have been, on my knee in front of the telly numbers. This is the third of four Creative Beadcraft kits (kit number 81 on their website) that  I ordered to improve my plier wielding. After this one I think I might be getting somewhere!


 Here are all the bits and pieces on my knee along with the tool kit I got for last month's project.  The whole bracelet is made from individual large jump rings.


Here is the first part of it complete after MUCH swearing


Four down, ten to go.


Half done, I had a break and watched the Great British Bake Off at this point. my fingers were hurting.


 Puffy crystal rondelles attached via head pins. It amuses me that they are "puffy" crystals for some reason.By this point I had new respect for chain mail makers of the olden days.


 Completed and ready to wear 


Worn by me! I really love wearing it and have had lots of compliments about it. 

This was a very time consuming but enjoyable project, so much so that i have ordered extra materials to make some for gifts. I did however, either order or get sent the wrong kit, and had enough materials to make a necklace not a bracelet, so I will just make two bracelets. I didn't bother with the matching earrings as I can't wear them but I might make them up later on as a gift. Top marks for this one! 

Wednesday, 11 September 2013

What I did on my holidays...


I have recently come back from my my second visit of the year with my little family to the Bluestones resort in Pembrokeshire.  If you have little kids and like being outside but also like a private good hot shower and a comfy bed, I really recommend it! 

Last time we never left the resort but this time we did a bit of sight seeing and exploring and this is what I came home with!!


We visited Tenby and found some lovely shells on the beach.  We also found a gorgeous jewellery supplies and bric a brac shop in Brychan Yard on Upper Frog Street, the name of which I have forgotten but I could have spent hours in there! I bought the butterfly, turquoise and orange coloured beads and leaf shaped clasp you can see in the photo below from there along with the gorgeous wooden plate/stand everything is displayed on. The plate is from France according to the shop owner and I completely love it, it is perfect for on my desk, putting my ongoing projects into and displaying pieces. 

I also bought some fossils for some wire wrapping from Solva and some handmade Welsh slate buttons from the Solva Woollen Mill which is worth a visit for the lovely gift shop which also sells excellent Christmas cards made from sheep poo

The acorns and oak leaves I am going to do something with, possibly involving a silicon mould. I got these along with some lovely bits of bluestone (that gives the National Park it's name) from the woods near an Iron Age Hill Fort. Interestingly this is the same bluestone that Stonehenge is made from, though there are many theories on how it travelled all the way to the Stonehenge site. 


Here are all my holiday bits minus some stones and shells I was cleaning, all boxed up, ready for the muse to strike and make many fabulous things that remind me of my adventures :)

We also visited St David's and popped into an exhibition of the Pembrokeshire Craft Makers. Which was both humbling and inspiring. All the work displayed was superb and beautifully crafted with amazing attention to detail.  But the display by Annette Gardener of Kittywake Enamels blew my mind, completely gorgeous, detailed exquisite work. I am thinking of saving up to buy one of her pieces. I particularly loved her Seascape jewellery. Very inspiring stuff!


Semi precious stone and pewter necklace and earrings

This is another Creative Beadcraft kit - number 19. (the fourth kit STILL hasn't come, grrr!)
There was a choice of colourways, I went for the second option - Amazonite. 

Here are all the components for making the necklace that were provided. 


I put a selection of the provided materials onto eye pins


I then laid them out on a bead board to choose the best placement


I decided where to place the pewter bits.  This bit was confusing as codes were given for the different pewter pieces in the instructions but no clue as to which code belonged to which bit! I even looked on the website but got no joy! 


The necklace was then assembled by creating loops at the end of the eye pins and using some jump rings for the pewter pieces


 I then added some chain to the top of the necklace using jump rings


There were also materials included to make matching earrings which can be seen here. However either the wrong components were included with the kit or some jump rings should have been included with the earring kit otherwise it was impossible to make! I used jump rings from the necklace kit but a beginner who didn't have extra jump rings would find this frustrating and confusing. 

I am happy with the jewellery though, I think it looks really good on and is very sparkly.  It also helped me very much with my pliers practice which was the aim of doing it. I used a pair of round nosed pliers, some needle nosed pliers and snips during making these pieces. So more of a challenge that the first project but annoying about the mystery component codes!! 

Monday, 9 September 2013

Rainbow Octagon Fancy Stone Necklace

This is the first kit from Creative Beadcraft I have tried.  I bought four with a view to improving my plier skills. Unfortunately only three have arrived and that is with some nagging! Hopefully the fourth one will be here soon.

This is kit number 164. All the bits and pieces needed (not tools) are included with colour instructions.  I initially chose this project after it was featured in the September 2013 issue of Make and Sell Jewellery magazine which I now have a subscription to :)
All the same instructions are available for free from the Creative Beadcraft website when you click on the kit.


This is what was included in the kit.


The instructions were easy to follow but a diagram of what was expected for this bit would have been good. 


Finished attachment of first stone to chain.


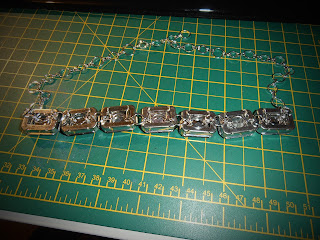
All attached, this didn't take very long. I then trimmed the chain to the length suggested and added a lobster clasp. I ignored the instructions and put on the colours in the order I fancied. I have tried it on and it needs to sit higher on me because of the weight of the stones otherwise they twist, so I attached the clasp further down the chain. 


The finished necklace! 


Overall I found this a very easy, simple project to produce an easy to wear bit of bling to cheer up the winter months :)